Too Many Requests from Your Network
Please complete verification to access this content.
Did you know you could use NinjaOutreach as a powerful add-on to your Zoho CRM?
While Zoho is a powerful CRM that can help you keep track of all your lead relationships, NinjaOutreach augments your contacts with an impressive database, so you can keep adding more qualified leads to your pipeline.
You’ll get access to the data of over 78 million business leads, influencers, bloggers, company websites, and more.
Data such as:
- Email addresses
- Social profiles
- SEO statistics (domain authority, estimated website traffic, Alexa rank, total backlinks, etc.)
- Total follower count
- Audience engagement score (Ratio of followers to shares and comments)
You can’t find these additional leads data using Zoho alone – and it would take you over 20+ hours more per week if you do it manually via Google, LinkedIn, or any other disparate lead gen apps.
With NinjaOutreach, you’ll have all these packed together, ready for importing to your Zoho CRM.
Interested to learn more? Read further.
Goal: Get more sales for your Business
Strategy: Partner with bloggers, influencers, and other companies for affiliate marketing, PR, and advertising.
Let’s start with an example scenario: You’re a CRM company targeting businesses.
You want to partner with bloggers, consultants, and consulting agencies in your target niche.
The purpose is to get affiliates or for PR, whatever they agree to – basically what you want is for them to recommend your CRM to their audience or the businesses they handle.
Since you plan for this to be a long-term, recurring setup, you need a way to manage your relationships with these partners.
How do you find the ones with a larger, more engaged following that are sure to send more valuable leads to your business?
Enter NinjaOutreach.
Finding and exporting leads from NinjaOutreach
Step 1. Search for leads in NinjaOutreach
Just go to the Websites & Blogs search then enter keywords related to the niche you’re targeting.
In this example, I’ll start with the keyword:
“business coach” – it’s important to put it in quotes to get only exact matches.
*Note: Obviously, different search terms will show different results. Experiment until you find the kind of leads you’re looking for.
Step 2. Use NinjaOutreach search filters to show only the leads with contact info and your minimum Domain Authority requirement.
I’ll use the filters to show only the leads with either an email address or contact URL.
To make sure I’ll find leads with established websites, I’ll set the Domain Authority (DA) filter to a minimum of 20.

Step 3. Review your search results, and save them into a list.
You can do a quick review of what your search turned up. If you like what you see, you can click “Save All” or you can also manually delete or add leads one by one using the checkbox and add lead icon.
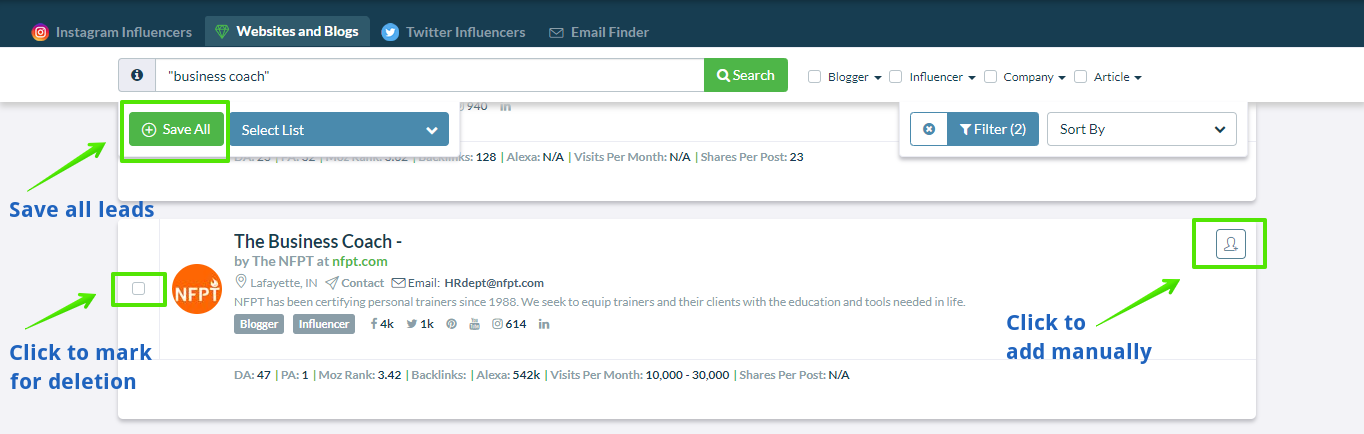
You’ll see a pop-up that lets you select which list to save your leads into. Just select from the dropdown on the left or name a new one on the right input field.
Below, I created a new list named “Business Coach Leads.”
Select the option for all 782 leads then click save.

Step 4. Export your list into a CSV
Go to the “Lists” tab in NinjaOutreach, select your list of leads, and click the export button to download everything into a CSV file that you can then import to Zoho CRM.

Importing your list of leads from NinjaOutreach to Zoho CRM
So now, how do you import these into Zoho CRM and still get to keep all the data you’ve collected from the NinjaOutreach database?
Check out the steps below. And remember, you only need to do these steps once.
Step 1. Click the settings icon then click Modules and Fields

Step 2. Create a new Module or Layout
You can either clone an existing module and customize it with a new layout, or you can create a whole new module from scratch.
Creating a new module may look like a lot of work, but once you’ve saved your new custom module, you won’t have to do this again.
A. To create a new layout, you can clone the Leads Module by clicking it.

Then, click New Layout.
This lets you modify the original Leads Module and add some Custom fields from NinjaOutreach.

B. Alternatively, you can also click the “New Module” button and go from there.

Step 3. Save your Module / Layout
Give your Module / Layout a name. In this case, “NinjaOutreach Leads.”
Click Save to prompt the permission settings box. Give access as you see fit, then hit save.

Now it’s time to edit your Module / Layout to add custom fields from NinjaOutreach.
Grab a coffee, as this is the part that could take a few minutes – but don’t worry, you only need to do this once and you’re set for all future NinjaOutreach to Zoho imports.
Customizing Zoho CRM fields to match with NinjaOutreach fields
Step 1. Drag and drop Zoho CRM fields to your module and rename to match them with NinjaOutreach fields
There are a total of 66 fields in NinjaOutreach, and you’ll need those NinjaOutreach fields to your reusable Zoho CRM custom module.
It’s drag and drop. So just move the right fields, rename them to match the NinjaOutreach fields, and hit save.

You can copy the list in the order I made below. Or you can also go to this spreadsheet and make your own copy.
This list below already includes all 66 NinjaOutreach fields, plus a few extra required fields unique to Zoho CRM.
NinjaOutreach Lead Information
- NinjaOutreach Lead Name
- Phone
- Secondary Email
- Secondary Phone
- Country
- NinjaOutreach List Name
- NinjaOutreach Lead Owner
- Email Opt Out
Lead History
- Notes
- Relationship
- NinjaOutreach Tags
- Email sent?
- Email Sent Date
- MM/DD/YYYY
- Opened
- Clicked
- Replied
Website Data
- Website Title
- Website URL
- Description
- Page Title
- Page URL
- About URL
- Contact URL
- Team URL
- Blog URL
- Podcast URL
- Resource URL
- Interviews URL
- Press URL
- RSS URL
- Infographics URL
- TLD
- Giveaways
- Product Reviews
- Sponsored Posts
- Guest Posts
- Social Media Profiles
- FB URL
- Twitter URL
- Pinterest URL
- Google Plus URL
- YouTube URL
- Instagram URL
- LinkedIn URL
- Social Media Metrics
- FB Shares
- Twitter Tweets
- Twitter Followers
- Pinterest Pins
- Google Plus Ones
- Instagram Followers
- Linked In Shares
- Facebook Followers
- Pinterest Followers
- Youtube Followers
- Comments Per Post
- Social Shares Per Post
SEO Data
- Alexa Rank
- Domain Authority
- Page Authority
- Backlinks
- Moz Rank
- Visitors Per Month
Additional Contact Information
- Email 3
- Email 4
- Email 5
- Phone 3
- Phone 4
- Phone 5
You can group and organize them however you like.
What I shared is just a quick example of how I’d do it.

Step 2. After adding custom fields, save your new custom module / layout
That process should take you anywhere between 10 to 40 minutes. Again, once you’ve saved your new custom module, you won’t have to do this again.
Step 3. Import leads from NinjaOutreach into Zoho CRM
Now, it’s time to import your new leads from NinjaOutreach.
From the main Zoho dashboard, go to your Leads tab, click Import, then Import Leads.

Once you see the menu below, just click the “From other CRMs” option.

Step 4. Match your NinjaOutreach imported file with the custom Zoho module/layout that you created
After uploading your spreadsheet, Zoho will prompt you to choose a “Module” that you will “map” your imported data to.
This step is called “File Mapping” in Zoho CRM.
Just choose the NinjaOutreach Module that we prepared earlier.

Click the checkbox beside the uploaded file to associate it with the NinjaOutreach Leads Module. Click Save, then Next.

Step 5. Match imported NinjaOutreach data with the correct Zoho custom fields
Next, you’ll need to toggle the fields in Zoho CRM to make sure they match the NinjaOutreach fields. This step is called “Field Mapping” in Zoho CRM.
*Note: If you created a New Layout based on the Leads module, you will be required to fill in the Lead Name and Lead ID fields for Zoho. Just match them with Name and List fields from NinjaOutreach.
| NinjaOutreach Fields | Zoho CRM Fields |
| Name | Lead Name |
| List | Lead ID |

You’ll also need to map other fields like Shares, Traffic, Backlinks, Domain Authority, etc. In this case, you need to set whether the data will be displayed as numbers, decimals, integers, range, text, etc.

Once done, click Create.
Step 6. Review if you’ve set things up correctly
If after clicking Save and Next, you get a prompt like the one below…

… this means you need to set the correct formatting for how your data will be displayed, such as:
- Dates – In this case, you need to follow the date formatting from NinjaOutreach. For example, in Email Sent date, we follow the MM/dd/yyyy/hh:mm:ss: a format.

Once done, click Next, and you should get a confirmation that your work has been saved.

Give one last review of your fields to make sure everything matches with your data source, then Start Migration.
Step 7. Start Migration and wait for the confirmation
Once you see the confirmation pop-up below, then you’re good to go!

Conclusion
And that’s it.
From here on, you can keep using this custom module/layout to keep importing new leads from NinjaOutreach and manage the rest of the process using your Zoho CRM.
Let me know if this tutorial helped or if I missed anything!