
Too Many Requests from Your Network
Please complete verification to access this content.
Moving a blog from one host to another is not a new thing among bloggers; we all tend to move our blogs to a new host for one reason or the other. Usually, the major reason why a lot of bloggers change their web hosts can be attributed to the thirst for better web hosting and quality of service.

I have moved my blogs across different web hosting server before I finally found rest of mind with Arvixe, since I joined Arvixe, I have been enjoying my stay with them and I have now plan to move anytime soon.
If you don’t know, I started offering Free WordPress Blog Setup on my blog and I also help people to move their blog too if they have already setup their blog. I have been moving blogs the old school way in the time past, but now with SSH, website transfer has become fun and an easy job to me.
Ever since I learnt how to move my blogs via SSH, I have been saving on Data and Time. I don’t need to use my internet data plan to download 1 gig files and also spend unnecessary 1 hour+ doing this. With SSH, you don’t use your data plan and you can move a huge site in under 10 mins without any stress.
That said, in this tutorial, I will be showing you how to take advantage of the SSH file transfer technology and start moving blogs or websites in short time with no stress at all! Lets see how to move your blog to another host using SSH.
Step 1 – Download a SSH Client/App
Before you can move your blog with SSH, you will need to download a SSH App which you will use to move your blog. There are lots of SSH client out there, but my favorite (the one I use) is called Putty. Putty is a free SSH App that allows you to connect to various servers via SSH and initiate SSH commands. Download Putty Here or at Putty.org.
Step 2 – Backup Your Blog Files
After you must have downloaded putty SSH App, the next thing is for you to backup your blog files into a .Zip file format. You may use other format like .Taz or.Tar.gz, but my Favorite and the one is use is the .Zip file compression format.
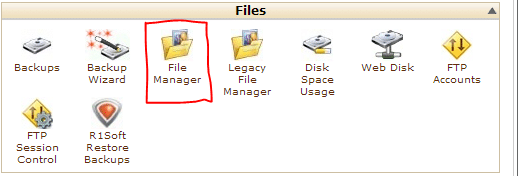
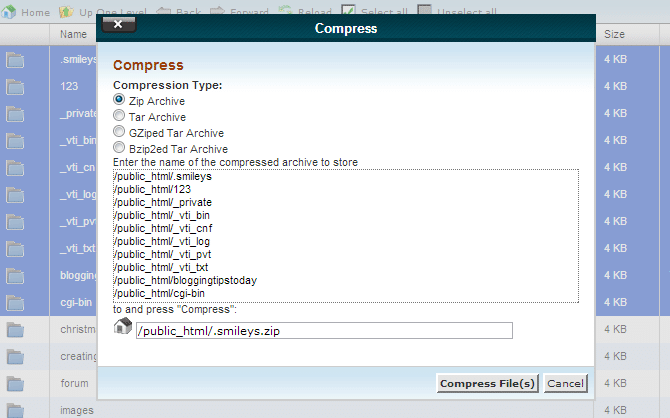
To do this, login to your blog control panel (cpanel), navigate to Files >> Public_html folder and Highlight every folder in this directory. Just Click on the first folder, Hold down “Shift”on your keyboard and press the down key. Make sure that all the folders in the Public_html directory have been selected.
Once, the whole folders are selected, right click on them as select “Compress”, a window will popup, select “ZIP” from the list of options there and choose your desired name for saving the files. Usually, I just use a short name like “transfer.zip” to save the file.
By now, I assume you have a “zipped” file of all your blog folder resting on your current server, if yes, gladly continue to step 3.
Step 3 – Connect Putty to Your New Server
In step 1 and 2 above, We have downloaded Putty and backed up your blog in form of a zip file on your current server. Now, it is time to transfer those file to your new server on that awesome web hosting that you just purchased.
For you to transfer this Zipped file we created in step 2, you will have to connect your putty SSH client to your new server. To do this, open the putty file you have downloaded to your PC, all things been equal, it should look like the image below!
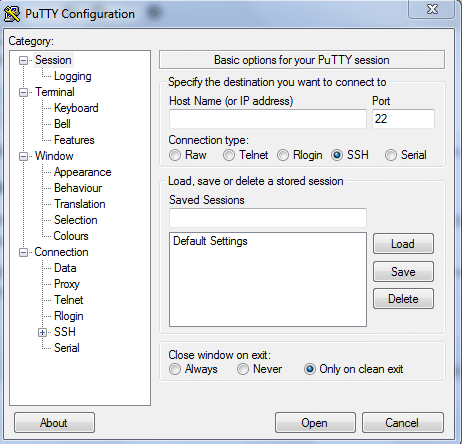
You don’t need to touch any settings on this app or configure anything, just leave the Putty SSH client setting as it is.
To connect this app to your new server, Login to your new Server Cpanel to get the IP address for your hosting account; usually, the IP will be in a mail sent to you when you bought the hosting plan, but if it is not there, just use the temporary cpanel link sent to you after you bought the hosting plan to access your cpanel.
The IP address will be located in the left hand sidebar of your cpanel, sometimes, you will need to click the “expand Stats” Icon to see Your IP address. see the images below.
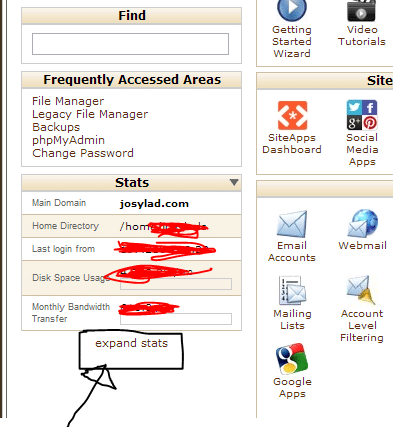
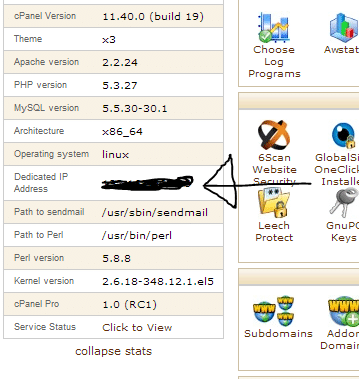
If you click the expand stats link like in the image above, you will get a long list of stats about your web server, just scroll down till you get to the IP address column and copy the IP you find there.
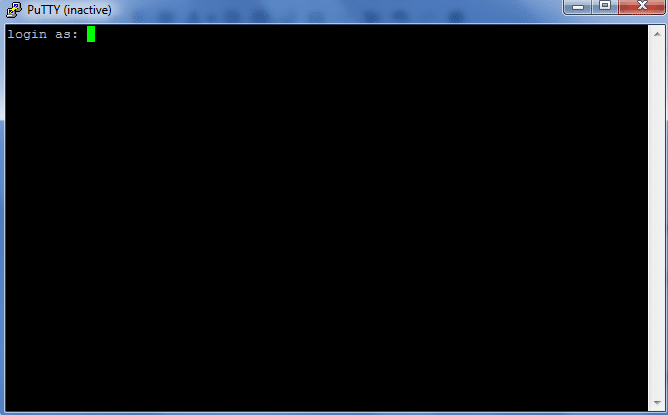
Once you have the IP address, go back to the Putty SSH client and Insert the IP into then “Hostname (or IP) box”. Leave the port and other options as it is and “Click Open”.
A window like the image below will come up and you will be requested to enter your login, the first thing is to enter your Cpanel username and press Enter on your keyboard. After pressing enter, it will prompt you for your password, just type your Cpanel password and it will connect to your public_html folder of your new server! 😀
Step 4 – Transferring Your Blog Files to the New Server
From step 1 to 3, we have downloaded Putty, Compress your blog files, connected Putty to your New server and now it is time to move your compressed .Zip blog files to your new server using SSH.
I will assume you have entered you username and password in to the putty command screen and you have been successfully logged into your web hosting server. If that is true, to commence the site transfer, just type the command below:
wget yourdomain.com/transfer.zip
Be sure to replace “yourdomain.com” with the domain name of the website you’re migrating! This is my favorite part of the process, as the ASCII animation shows the ZIP file is downloading. You will also get to see the estimated time for the file transfer to be completed.
Once the file has been successfully transferred to your new server, it’s time to unzip it and open it! 😀
Step 5 – Unzipping the File and Opening It
Once you have successfully transferred your blog files using Putty SSH Client, just exit/close the putty client and go login to your Cpanel via a Web Browser. When you login, go to files >> File manager >> Public_html folder like you did in step 2.
If all things went well, you should be able to find the ZIPPED file you move in this directory, so you should see “transfer.zip” or whatever the name of the file you used .Zip. Right click on this File and Select Extract from the Options.
Your Zipped file should start extracting by now and it should be done in less than 1 minute. Congrats, you have now successfully Moved your WordPress Blog files to a New Server using SSH.
For Security purpose, make sure you delete the ZIPPED file after you have extracted it to your new server.
Note: You should note that this will only migrate your site files. This doesn’t move your database or any email server configurations/settings you may have. You’ll also want to make sure your .htaccess doesn’t have anything that would only relate to your previous server, as well as any folders and files that were migrated from your old server setup.
You don’t need to panic, all you need to do now to complete your Blog Transfer is to Download Your Database from your old server and move it to your new Server. I believe this post is long enough, so I have decided to create a follow up post detailing how to move your Blog Database, this post will be a continuation of this one.
So, If you have successfully moved your WordPress Blog Files via SHH using this tutorial, and you don’t know how to move your database, just make sure you subscribe to this blog as I will be publishing the concluding part of this tutorial in a day or two.
[shadowbox]It is 11 PM over here, I guess I need to give my bed a big hug! If you are not the techie type and you can’t comprehend how to go about doing this, you can hire me (by sending a message via my contact form) to help you move your blog. [/shadowbox]
If you have any questions or problems as regard this tutorial, drop it in the comments and I will gladly help you out.
Read the Follow Up Post – How to Move Your WordPress to a New Server